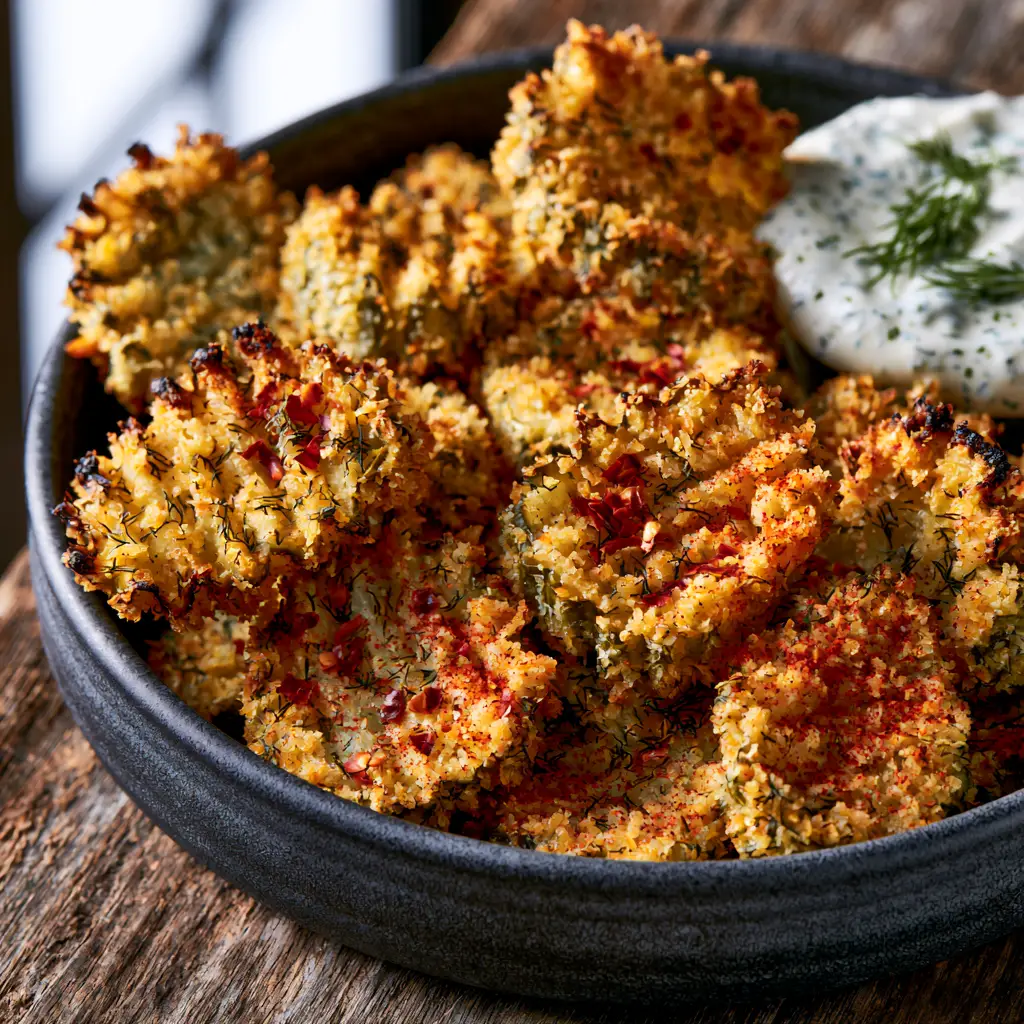
There is a specific, primal satisfaction that comes from biting into spicy dill pickle chips that have been engineered for maximum auditory and textural impact. Imagine a crinkle-cut pickle, its ridges providing extra surface area for a thick, jagged coating of golden-brown panko breadcrumbs. As you take a bite, the initial snap of the fried crust gives way to the tangy, juicy burst of a brined cucumber, all while a slow-burn heat from cayenne pepper and red chili flakes begins to tingle on your tongue.
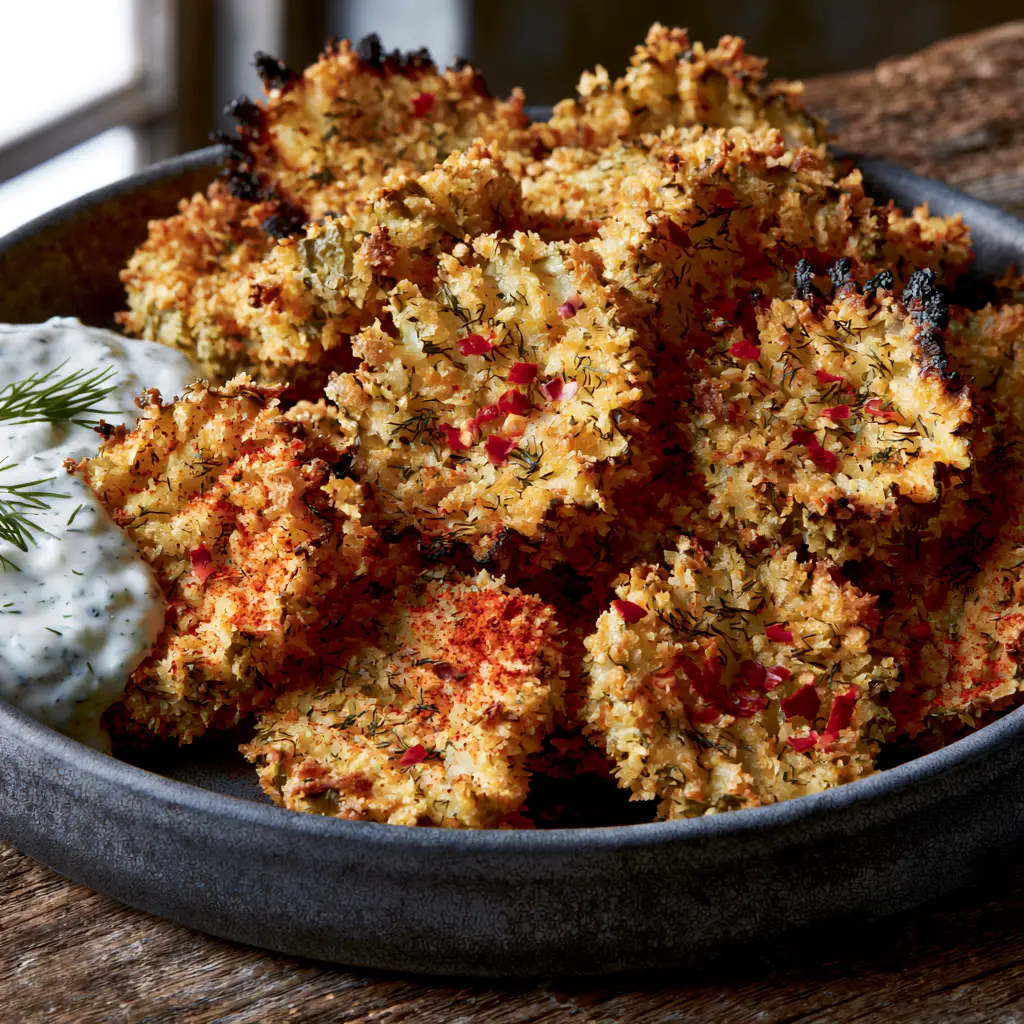
This isn’t your average pub grub; this is a culinary masterclass in balancing acidity, fat, and fire. When plated in a matte charcoal bowl, the vibrant greens of the pickles and fresh dill sprigs pop against the rustic wooden backdrop, creating a visual feast that matches the intensity of the flavor. Whether you are hosting a high-stakes game night or simply craving a sophisticated snack, these chips deliver a sensory experience that lingers long after the last crumb is gone.
The secret lies in the “Forensic Visual Bridge”—ensuring that every fleck of dried dill and every speck of bright red chili flake visible in the crust is accounted for in the flavor profile. We aren’t just making food; we are creating a textural landscape that demands a side of velvety white ranch dressing to soothe the heat. Let’s dive into the science of the crunch.
The Anatomy of the Perfect Spicy Dill Pickle Crunch
- The Crinkle-Cut Advantage: The undulating surface of a crinkle-cut pickle isn’t just for aesthetics; those ridges act as anchors for the flour and egg wash, ensuring the panko crust never slides off.
- Triple-Threat Heat: We utilize a layered approach to spice, incorporating crushed red pepper flakes into the breading and a final “cayenne dust” post-fry for immediate tongue impact.
- Panko Precision: Unlike standard breadcrumbs, panko flakes are larger and airier, which prevents the coating from becoming a dense, oily brick and instead creates a light, glass-like shatter.
- The Cooling Component: A thick, herb-flecked ranch dip is the essential structural partner to the spicy chips, providing a lactic acid barrier to the capsaicin.
Essential Components for Your Spicy Dill Pickle Chips
Crinkle-Cut Dill Pickle Slices: 2 cups (approx. 300g) of thick-cut, high-quality dill pickles are the heart of this dish. Look for pickles with a firm snap, as overly soft pickles will turn mushy during the high-heat frying process.
Panko Breadcrumbs: 1.5 cups (90g) of Japanese-style panko provide the signature jagged exterior. These breadcrumbs absorb less oil than traditional crumbs, keeping the spicy dill pickle chips light and crisp.
All-Purpose Flour: 0.5 cup (64g) serves as the primary “primer” for the pickles. It dries the surface of the brine-soaked vegetable so the egg wash can adhere perfectly without slipping.
Large Eggs: 2 large eggs act as the protein-rich glue. When whisked thoroughly, they create a thin but strong film that binds the heavy panko and spices to the pickle ridge.
Dried Dill Weed: 1 tbsp (2g) mixed into the breading ensures that the “dill” flavor isn’t just in the pickle, but toasted directly into the crust. This provides a deep, savory aroma that complements the vinegar tang.
Crushed Red Pepper Flakes: 1 tsp (2g) provides visible red flecks and localized bursts of heat. These flakes toast in the oil, releasing their fat-soluble capsaicin directly into the panko layer.
Cayenne Pepper: 0.5 tsp (1g) for the breading and an extra pinch for the “dusting.” This fine powder ensures every millimeter of the chip carries a consistent, sharp heat.
High-Smoke Point Oil: 2 cups (480ml) of neutral oil, such as canola or grapeseed, are required for frying. A high smoke point is critical to achieving that “slightly charred edge” look without imparting a burnt flavor to the oil itself.
Fresh Dill Sprigs: Used as a garnish, these add a bright, grassy finish and a pop of green color that contrasts beautifully against a charcoal bowl.
Creamy Ranch Dressing: 0.5 cup (120ml) serves as the cooling dip. If you’re looking for more variety in your dipping game, you might also enjoy this velvety homemade chip dip for a different flavor profile.
Tools for Professional Results
To achieve the “ultra-crunchy” results seen in high-end foodie photography, you need the right gear. A heavy-bottomed cast iron skillet or a Dutch oven is preferred for its heat retention properties, ensuring the oil temperature doesn’t plummet when the cold pickles are added. You will also need a wire cooling rack set over a baking sheet; placing fried chips directly onto paper towels can trap steam and lead to a soggy bottom. Finally, a fine-mesh sieve is the best tool for applying that final, even dusting of cayenne pepper.
The Step-by-Step Path to Golden-Brown Perfection
Preparing the Pickle Foundation
Begin by draining your crinkle-cut pickles thoroughly. Lay them out in a single layer on a double thickness of paper towels and pat the tops dry. This is the most critical step; if the pickles are wet, the steam generated during frying will push the crust away from the pickle, causing it to fall off. Let them air dry for 5-10 minutes while you prepare your dredging station.
The Engineering of the Breading Station
Set up three shallow bowls. In the first, place your all-purpose flour seasoned with a pinch of salt. In the second, whisk the two eggs with a teaspoon of water until no streaks of egg white remain. In the third bowl, combine the panko breadcrumbs, dried dill weed, and crushed red pepper flakes. Use your fingers to toss the panko mixture so the spices are evenly distributed; you want to see those “visible flecks” of red and green in every handful.
The Three-Stage Coating Process
Take a dried pickle chip and toss it in the flour until fully coated, then shake off the excess. Submerge it in the egg wash, ensuring every crinkle is moistened. Finally, press the chip firmly into the panko mixture. Do not just toss it; use your palm to press the panko into the ridges. This ensures a thick, architectural crust that will stand up to the heat of the oil.
Achieving the Deep Golden-Brown Fry
Heat your oil to 375°F (190°C). Carefully lower the chips into the oil in small batches to avoid overcrowding. Listen for a vigorous sizzle—this indicates the moisture in the crust is evaporating, creating the crunch. Fry for 2-3 minutes per side. Look for the edges to turn a dark, toasted brown while the center remains a vibrant golden hue. Use a slotted spoon to remove them when they reach that perfect charred-edge aesthetic.
The Final Flourish: Cayenne Dusting and Plating
While the chips are still hot and glistening with a trace of oil, place them on the wire rack and immediately dust them with a fine layer of cayenne pepper. This creates the “cayenne pepper dust” effect described in our visual blueprint. Transfer the pile of chips into a matte charcoal ceramic bowl. Serve immediately with a side dish of thick white ranch dip speckled with fresh dill sprigs. For a full spread, these chips pair beautifully with an Italian focaccia sandwich or a light mango chickpea salad to balance the fried richness.
Expert Tips for Success
- Oil Temperature Management: If your oil is too cold (below 350°F), the breadcrumbs will soak up the grease like a sponge. Use a clip-on thermometer to ensure you stay in the 375°F sweet spot.
- The “Dry Hand/Wet Hand” Rule: When breading, use your left hand for the flour and panko (dry) and your right hand for the egg wash (wet). This prevents your fingers from becoming breaded “club hands.”
- Crinkle Depth: If you are slicing your own pickles from whole dills, use a mandoline with a crinkle-cut blade. The deeper the ridges, the more crunch you can pack onto each chip.
- Serving Speed: These chips are at their peak for exactly 15 minutes after frying. If you need to keep them warm longer, place the wire rack in a 200°F (95°C) oven.
Storage, Reheating, and Freezing
While spicy dill pickle chips are best enjoyed fresh, you can store leftovers in an airtight container in the refrigerator for up to 2 days. To reheat, avoid the microwave at all costs, as it will turn the panko into mush. Instead, use an air fryer at 380°F (193°C) for 3-4 minutes or a toaster oven until the oil begins to sizzle again. We do not recommend freezing the finished chips, as the cucumber interior loses its structural integrity upon thawing.
What to Serve With This
These chips are a powerhouse of flavor and need sides that can either stand up to the heat or provide a refreshing contrast. For a lunch pairing, try them alongside a refreshing no-cook noodle salad. The acidity of the pickles also makes them a great precursor to a heavier main like sesame ginger tuna steak. If you’re leaning into the snack theme, a platter featuring these chips and some sweet tanghulu for dessert offers a brilliant “salty-spicy-sweet” trajectory for your palate.
Frequently Asked Questions
Yes! Preheat the air fryer to 400°F (204°C). Lightly spray the breaded chips with oil and cook for 8-10 minutes, flipping halfway through, until they are golden and crispy.
For a milder chip, omit the cayenne dust at the end. For extra heat, add a half teaspoon of cayenne pepper directly into the flour dredge in addition to the panko mixture.
The key is to pat the pickles completely dry before breading and to serve them on a wire cooling rack after frying. This allows air to circulate and prevents steam from softening the crust.
Crinkle-cut dill pickles are best because the ridges provide more surface area for the breading to cling to, resulting in a much crunchier final product.
This usually happens if the pickles were too wet or if the oil wasn’t hot enough. Make sure to use the flour dredge as a primer and ensure your oil is at a steady 375°F (190°C).
The Ultimate Spicy Dill Pickle Chips Recipe
Spicy Dill Pickle Chips: The Ultimate Ultra-Crunchy Panko Recipe
Ingredients
Equipment
Method
- Drain the pickles and pat them extremely dry between layers of paper towels. Moisture is the enemy of a crunchy crust.
- Place flour in bowl one. Beat eggs in bowl two. Mix panko, dried dill, and red pepper flakes in bowl three.
- Dredge each pickle in flour, dip in egg wash, and press firmly into the panko mixture until heavily coated.
- Heat oil to 375°F (190°C). Fry chips in batches for 2-3 minutes per side until deep golden-brown with charred edges.
- Remove to a wire rack. Immediately dust with cayenne pepper. Serve in a charcoal bowl with ranch and fresh dill.
Notes
Press the panko into the pickle ridges manually for better adherence.
Closing & Call to Action
Mastering the art of the spicy dill pickle chips is a journey into the heart of texture and temperature. By focusing on the visual cues—the golden panko, the red pepper flecks, and the matte charcoal plating—you ensure a dish that is as beautiful as it is delicious. If you loved this crunchy transformation, please leave a comment below and share your results! Don’t forget to follow us on Pinterest for more visually stunning recipe inspiration. Happy frying!